… oder: vom zusammenleben mit der kleinsten semiprofessionellen drohne, der mavic pro von DJI. in englisch und deutsch. eine erfahrungssammlung.
[one-half-first]
→ tripod → indoors
the mavic pro is an amazing photo/video drone with some flaws and several things to think about when getting used to it. here is a growing list of my experiences which you don’t find in the manual. most considerations apply to all photo drones.
firstly, keep in mind that a photo drone is two things in one: a camera and a flying machine. if you have never flown a drone before you will see that both things are merely compromises until you progress. in order to become a drone pilot you need lots of practice. a drone flies differently from a boeing aircraft or a fighter plane in a computer game. a key thing is to know where the front of the drone is, because all your joystick movements rely on the orientation of the mavic. example: if the drone is 20 meters away from a tree and you try to fly it more into the open, you can easily navigate it into the tree – where it crashes and falls to the ground.
if you invoke the wrong motion, think of the pause button on the controller. it makes the mavic halt and stay where it is. then take your time to find the front of the aircraft, rotate it smoothly, check what the camera tells you about north and south, rotate the drone so that its rear points to the tree and then slowly move the right joystick forward.
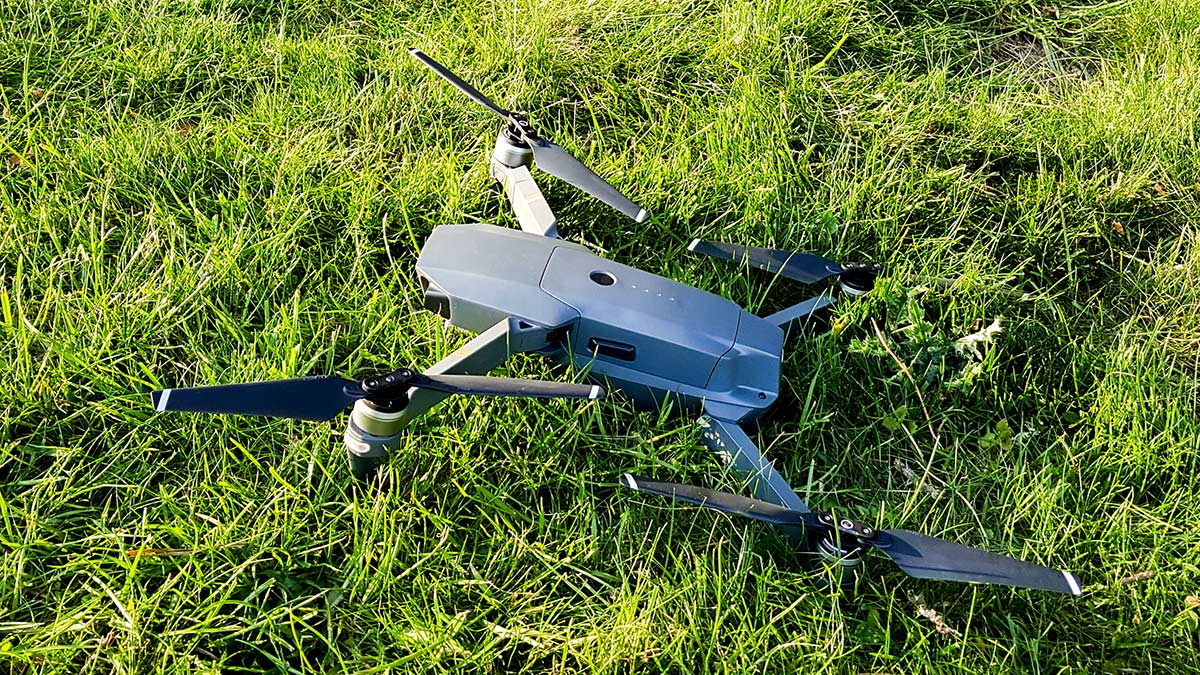
the mavic is a fast drone. it accelerates astonishingly fast and thus may land easily, within seconds, in a tree or at the wall of a house.
there is a mode which is called „tripod„. very good for first exercise. it makes the mavic very slow. don’t enter s-mode using the slider on the right. s = sports mode makes the aircraft very sporty. an option for smooth videos is the cinematic mode which is not good for beginners either because it slows down not only fast joystick movements but also braking. and there is a dangerous mode called „tap fly„: you select an object on the smartphone screen, and the mavic shoots off in that direction. i tried that today again. i showed the drone camera my humble self, and it accelerated towards me, over me and off it went. behind me were trees! pause button as the last rescue.
if you think you’re drone is getting into problems, press the pause button and then check things above. if there’s nothing above the mavic, fly it to a higher altitude in order to get a better overview of things.
the mavic has optical sensors to the front and to the buttom. they work within a range of over 10 meters. however, complex, „airy“ objects like trees might not be detected properly, and if the drone is flying fast it might not be able to stop anyway. the sports mode deactivates the front sensors.
small, super fast ready for take-off
fly the mavic close to you, let it circle around you. there are tracking and spotlight modes which help you with such complex movements. when you try out your own manual circle path, be not too close to the ground and check if there is enough space around you in case you apply the „wrong“ joystick pressure.
a strange thing about drones is that they can fly far away from us. in airplanes and cars we normally sit inside the moving object. the mavic is all alone on her (its?) trip. because of that distance we don’t see how close the drone is from a house or a car or a high tree or a power line. we have to rely on the camera. so learn to rotate the mavic and its gimble (which carries the camera).
if you record video or stills, they are stored in a decent resolution on your smartphone – with the sound you hear on the ground, the drone’s propellers, the conversation with your friend. the drone itself stores a high res version of the same material on its built in SD-card.
don’t fly the mavic inside buildings – until DJI finds a solution to this. there’s a flaw which can easily cause crashes: the drone is in ATTI mode which means it listens to you, you control its position, it does not know where it is. if then, all of a sudden, a GPS signal comes in through a window, the mavic autonomously switches to GPS-mode and tries to, autonomously, „correct“ its position. in that case it almost certainly flies against a wall and you can’t stop it! from what i heard, other DJI drones have a button on the controller to explicitly disable GPS.
and be careful flying it at night. under some countries‘ law it’s prohibited anyway. but if you do fly at night, be aware of the optical sensors not seeing much. this becomes problematic when the mavic needs precision maneouvres, for example for landing. even with excellent GPS signals it tends to hover unstably, drift off into all directions, and when you finally attempt to land it, it won’t detect the ground; so you might have to apply extra care settling it smoothly in the grass.
similar irritations appear when the mavic is close to a smooth water surface. i flew it over a lake in bright light, and when lowering the altitude and getting 5 or so metres above the lake’s surface, the thing did irritating motions like slowly descending further (which i did not invoke).
[/one-half-first]
[one-half]die mavic pro ist eine erstaunliche drohne zum filmen und fotografieren. sie hat einige probleme, vor allem aber möchte ich hier in einer wachsenden liste auf dinge hinweisen, die mir in den ersten wochen mit dem gerät auffielen, und die nicht in der bedienungsanleitung stehen.
zunächst mal ist es gut zu wissen, dass wir als autofahrer wissen müssen, wie wir ein auto fahren, aber nichts weiter. beim fliegen lassen einer fotodrohne ist man zweierlei: pilot und fotograf. wer nie zuvor eine drohne geflogen hat, wird merken, dass man nicht beides gleich gut sein kann. und aus gründen der sicherheit sollte man sich anfangs auf die navigation konzentrieren. das filmen kommt später.
drohnen fliegen anders als normale flugzeuge, auch anders als die kampfjets in computerspielen. sie stehen wahnsinnig stabil an einem punkt in der luft, und wenn man sie nach vorn bewegen will, muss man wissen, wo vorn ist – bei einer drohne nicht trivial. die roten lichter der mavic sind vorn, das grüne hinten. davon sieht man aber bereits auf eine entfernung von 20 metern praktisch nichts mehr. wenn man in der nähe eines baums oder hauses ist, kann eine falsche joystickbewegung katastrophal sein. wenn die drohne 5 meter entfernt von der hausmauer in der luft steht, mit dem hinterteil zur hauswand, und man meint, man möchte sie „zurück“-holen und zieht den rechten joystick beherzt zu sich, fliegt man die mavic direkt in die wand rein. also: erst in ruhe checken, wo vorn ist.
Im falle von unsicherheiten ist der pause-knopf auf dem controller gold wert. vielleicht muss man zur orientierung auch mal nach oben fliegen – aber vorher gucken, ob alles frei ist. es könnte ja ein dachgiebel vorstehen. die mavic ist sehr schnell, und in der grundstellung, so wie sie ausgeliefert wird, fliegt sie auch sehr ruppig. sobald wir nicht mehr beschleunigen, bleibt sie fast ruckartig in der luft stehen usw.
es gibt den „tripod“-modus, wobei tripod für stativ steht. in dieser stellung wird die mavic sehr langsam und träge. ideal für erste experimente. das gegenteil ist der sport-modus, den man über den rechten schieberegler (oft aus versehen) aktiviert. vorsicht! auch der „cinematic“-modus wirkt sich auf die flugeigenschaften aus, indem die mavic nämlich schnell fliegt, sich sanft dreht usw. das problem für anfängerübungen mit diesem modus ist, dass er auch langsam abbremst.
die mavic hat optische sensoren vorn und unten. sie erkennen objekte in bis zu 15 metern abstand, aber nicht unbedingt so luftige strukturen wie die blätter von bäumen. im sport-modus sind zudem die front-sensoren deaktiviert.
ein gefährlicher modus, den ich auch jetzt noch vermeide, ist „tap fly“, auch „target“-mode genannt. dabei tippt man am smartphone-bildschirm ein objekt im sichtbeteich der kamera an, und ab geht die drohne. ich habe die drohne heute mal 100 meter entfernt, 20 meter hoch auf mich blicken lassen, auf tap fly getippt und dann auf mich, und die mavic flog sehr schnell in meine richtung und über mich hinweg – richtung bäume. diesen modus kann man, wie alle, abbrechen, aber bei der aufregung muss man erstmal den richtigen menüeintrag dafür finden.
ich würde die mavic anfangs immer schön nah bei mir selbst halten und dann zum beispiel probieren, wie ich sie manuell, also nur mit den joysticks, um mich herum kreisen lasse. mit den tracking- und spotlight-modi geht das mehr oder weniger automatisch, aber es ist klug, ohne diese tools kreise, schleifen, bögen zu fliegen, dann gemischt mit hoch-runter-bewegungen.
ein seltsames ding mit drohnen ist, dass sie weit weg fliegen können. in flugzeugen und autos sitzen wir immer drin, die mavic geht mit ihren 1000 € allein auf die reise, und oft wissen wir nicht, wo sie genau ist, insbesondere wissen wir nicht, wie nah die drohne an einer wand oder an einem baum ist, und aus 200 metern distanz können wir auch die höhe nur schlecht einschätzen. also immer kamera checken, und um den überblick zu gewinnen, pause-taste drücken und, falls möglich ordentlich nach oben gehen.
man kann natürlich auch als anfänger schon filmen und fotografieren. die filme werden lokal auf dem smartphone in akzeptabler auflösung gespeichert (mit dem ton unten, also wie wir mit unseren freunden reden und wie die ankommende drohne summt). die höhere auflösung aber speichert die drohne selbst auf der eingebauten SD-karte.
ich würde die mavic vorerst nicht in innenräumen fliegen lassen, weil ich schon zwei gecrasht habe. das problem scheint zu sein, dass die drohne im ATTI-modus sich allein auf unsere steuerung verlässt, weil sie ja kein GPS-signal emfängt, und das ist auch gut so. falls dann aber der ein oder andere satellit zufällig zum fenster reinfunkt, schaltet die mavic automatisch auf GPS-modus um, sucht sich eine neue position und schießt davon, gegen die wand. sie reagiert dabei nicht mehr auf unseren controller. andere drohnen von DJI haben, soweit ich das richtig verstanden habe, einen eigenen knopf am controller, um GPS explizit auszuschalten.
auch das fliege nachts (in deutschland verboten) ist problematisch, weil die optischen sensoren nicht mehr viel sehen und das präzise agieren in engeren zusammenhängen (etwa nahe an mauern oder beim landen) von unerwünschten eigenbewegungen begleitet werden. auch sehen die bodensensoren das gras nicht, auf dem wir landen wollen, sodass wir die drohne manuell und sehr vorsichtig aufsetzen müssen.
ähnliches abdriften passiert über wasser. ich flog die mavic bei sonnenschein über einen see, ließ sie beim zurückkommen auf etwa 5 oder 4 meter über dem wasser absinken – worauf sie sich nicht mehr präzise steuern ließ und insbesondere in der höhe schwankte! die bodensensoren sahen offenbar in der glänzenden oder schwarzen oberfläche keine strukturen mehr. es war mir zu riskant, die drohne nah an der wasseroberfläche zu mir zurückfliegen, also stieg ich auf 15 meter hoch, wodurch die präzision wieder hergestellt war, und landete dann am strand, von oben, statt von vorn.
zur im april 2017 in kraft getretenen drohnenverordnung der bundesrepublik siehe → diesen eintrag.
[/one-half]
three challenges for a start
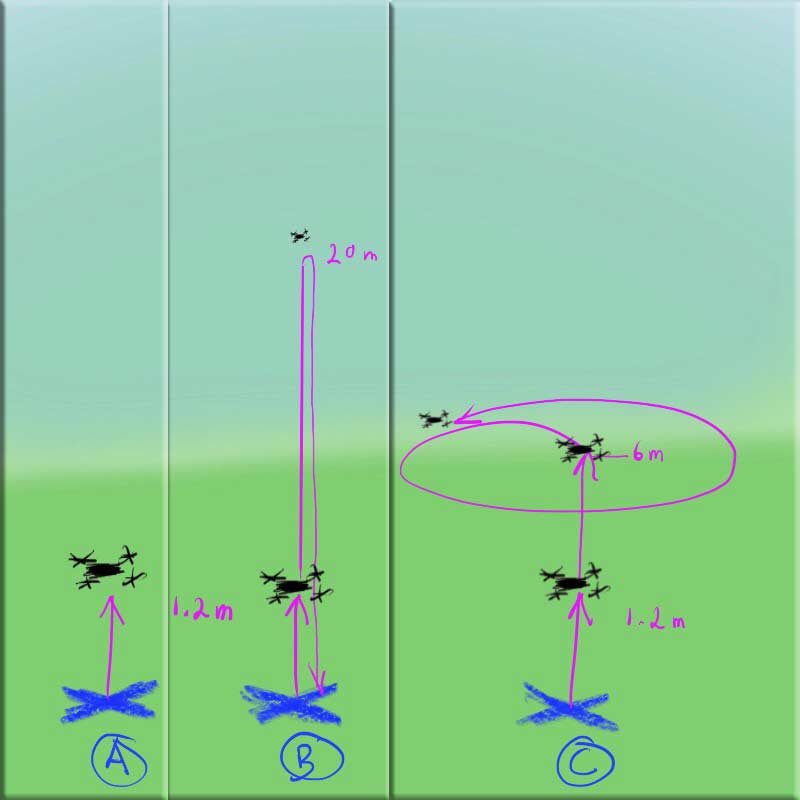
[one-half-first]above you see three scenarios you might want to try when you take your mavic out for a first spin. (A) is the beginner challenge: in the app you find an icon which lets the mavic take off. don’t be shy pressing that icon because it won’t make the drone take off immediately. it presents you a slider which you have to move from left to right and tells you that the mavic will take off now and hover 1.2 meters above the ground. it won’t do anything else. once it’s hovered for a while, move the left joystick towards you (back = down), keep it in that position, and after a second of thought the drone will land just where it took off.
scenario (B) starts the same way. however, when the drone hovers at 1.2 meters above ground, push the left joystick forward (forward = up) smoothly: the aircraft will rise and rise until you let loose of the stick. i suggest 20 meters, which is quite high. when the drone is up there, rotate it using the left joystick: left turns the mavic counterclockwise, right turns it clockwise. look up and check if you see what’s the front and what’s the back. then try the camera: you can tilt the camera down using the wheel next to your left middle finger. take a photo by pressing the button on the controller’s back right. button back left initiates the video recording, pressing it again stops the recording. once you’ve overcome the shock of your 1000 € gadget being so far away from you, use the left joystick again to let it land. it will land pretty close to where it took off. before it actually lands it will hover a second or two. keep the down-joystick pulled, and it will land alright.
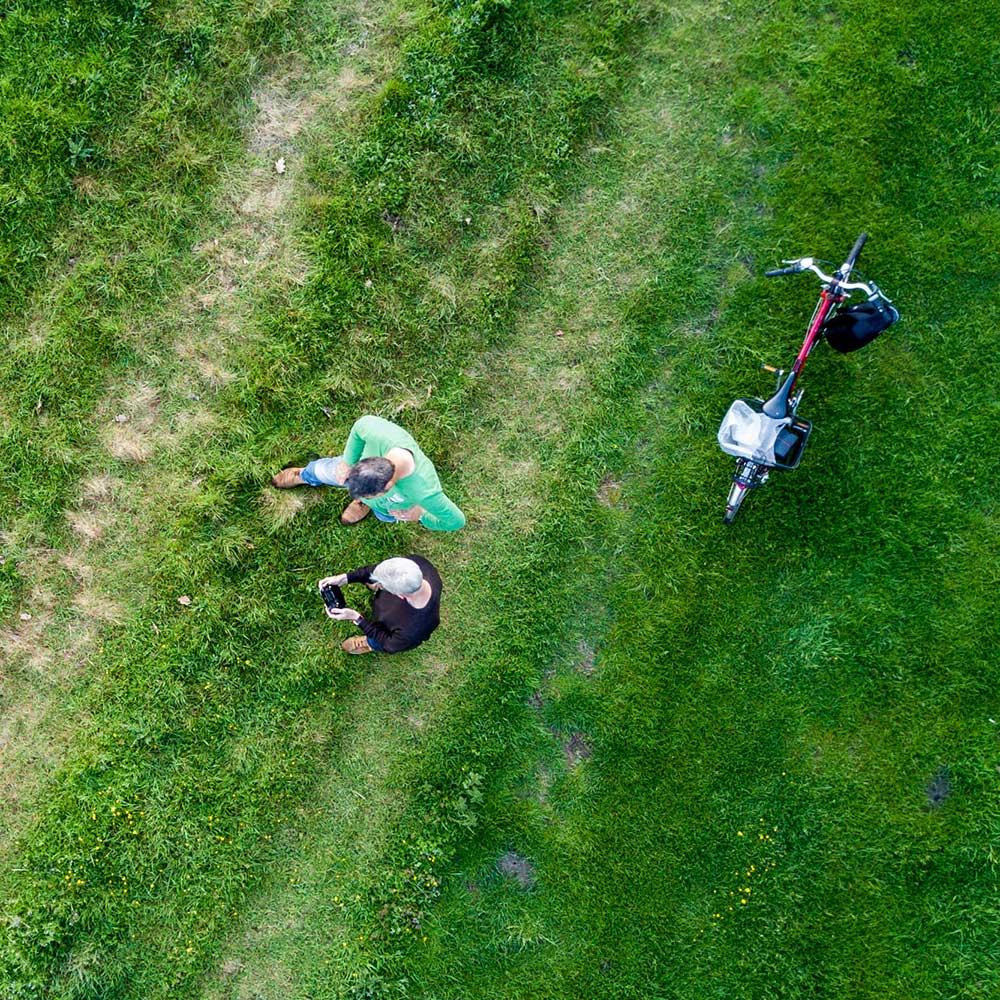
scenario (C): make the mavic take off and hover at 1.2 meters. then lift it up to, say 6 meters, let loose of the left joystick, and with the right joystick only try to fly a circle around/above yourself. this is tricky, i know, don’t let the drone shoot off into an unknown direction. smooth movements. keep the circle small. and always check what’s the mavic’s front and what’s its back. hint: try to describe a circle with the right joystick. my friend and collegue christoph today did it much better than me by flying the drone forward (right stick forward) while rotating the aircraft using the left stick.
[/one-half-first]
[one-half]
oben sind zwei harmlose anfängerübungen und eine etwas fortgeschrittenere abgebildet, die es durchaus in sich haben. (A) funktioniert so: in der app gibt es links ein icon für „take off“. das kann man gefahrlos antippen, die drohne startet dann noch nicht. wir müssen erst einen schieberegler auf dem bildschirm nach rechts bewegen und lesen den hinweis, dass die mavic dann starten und 1,2 meter über dem boden in der luft schweben wird. nicht erschrecken! in dieser lage kann man sie sich von allen seiten aus ansehen und sich wundern, wie stabil sie in der luft steht. linker joystick nach unten (unten = sinkflug), und die drohne landet. weil sie vor der landung kurz nachdenkt, bitte joystick schön gezogen halten, bis die rotoren ausgeschaltet sind.
szenario (B) war für mich ein schock, weil die drohne so weit oben war. normaler start wie zuvor, dann linken joystick sanft (!) nach vorn drücken (vorn = hoch), bis am display so 20 meter zu sehen ist. das geht schneller als man denkt. dort oben kann man dann ebenfalls mit dem linken joystick die drohne drehen: joystick links gegen und joystick rechts mit dem uhrzeigersinn. wenn man dabei nach oben sieht, kann man einen ersten eindruck davon bekommen, was bei der drohne vorn und hinten ist. auch die kamera kann man hier mal bewegen, hoch und runter mit dem drehrad am linken mittelfinger. um ein foto zu schießen, beherzt auf den knopf hinten rechts am controller drücken. für video ist der linke knopf da: nochmal drücken, um die videoaufnahme zu stoppen. eine gute übung an dieser stelle ist, sich selbst von oben anzugucken. um die drohne zu landen, linken joystick zu sich ziehen. die mavic sinkt halb so schnell wie sie gestiegen ist, und kurz vor dem boden denkt sie wie schon zuvor nach.
szenario (C) beginnt genau wie oben. wir bringen die drohne aber nicht so hoch, vielleicht auf 6 meter. jetzt kommen nur die rechten joystickbewegungen zum einsatz: wir versuchen damit, einen kreis um/über uns herum zu fliegen. vorsicht mit zu schnellen joystick-auslenkungen, weil die mavic dann gern in eine richtung wegschießt. am besten enge kreise üben. tipp: den rechten joystick sanft (und nicht in alle ecken drückend) langsam im kreis drehen. wobei mein freund und kollege christoph es heute auf anhieb einfacher hinbekam, indem er die drohne dauernd vorwärts fliegen ließ (rechter stick) und dabei drehte (linker stick).
[/one-half]