ricoh theta V | unausgereift

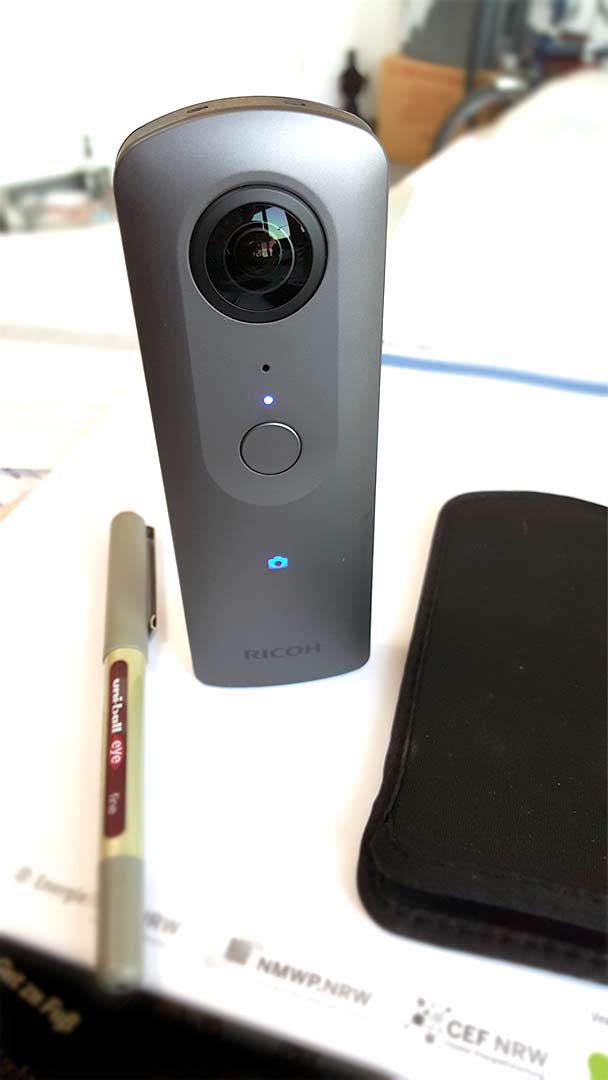
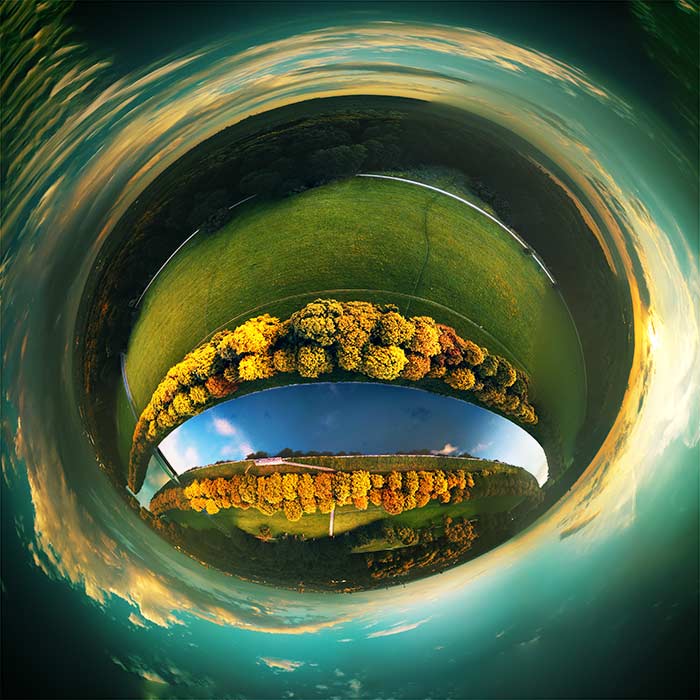
ricoh theta V. starke hardware! foto: ms/dpa


[three-fifths-first]

this is a review of the ricoh theta V camera which takes 360° surround photos and videos in 4k. the review is in german, so you might want to use google translate or deepl.com to read it. here i’ll give you an abstract in english:

the camera is great, the image quality and the design excellent, the stitching process works almost in realtime, and the stitching corners are hard to determine. the theta V fails to provide RAW photos. this can be fixed in the firmware i guess, it’s definitely not state of the art any more to not provide DNG or another RAW format in addition to jpeg.

the real problems have to do with the periphery. and they are massive. you need a PC or mac or smartphone or tablet to access the camera. the apps treat data privacy with little respect, urging us to hand over our twitter or facebook account data, including, of course, although everyone at ricoh will deny it, our passwords. the android app crashes constantly and often does not WiFi-connect to the camera. the connection process is complicated and flawed. for example you cannot access the help function while the smartphone is connected to the theta. (you’re basically offline, and ricoh did not build the anyway small manual into the app but leaves it as html on its website. the PC app does basically nothing but display 360° footage – and update the firmware. it pretends to convert the original videos from the theta to a youtube-friendly format, but in fact it does not change the file size, and it does not provide feedback while processing the data.

the camera is basically useless without a selfie-stick or a tripod. and the timer desperately needs more options. currently you have 3 seconds to hide under the table.[/three-fifths-first]
[two-fifths]

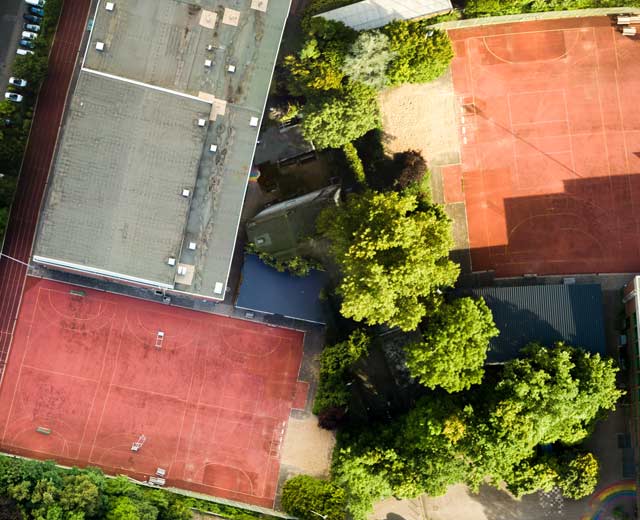
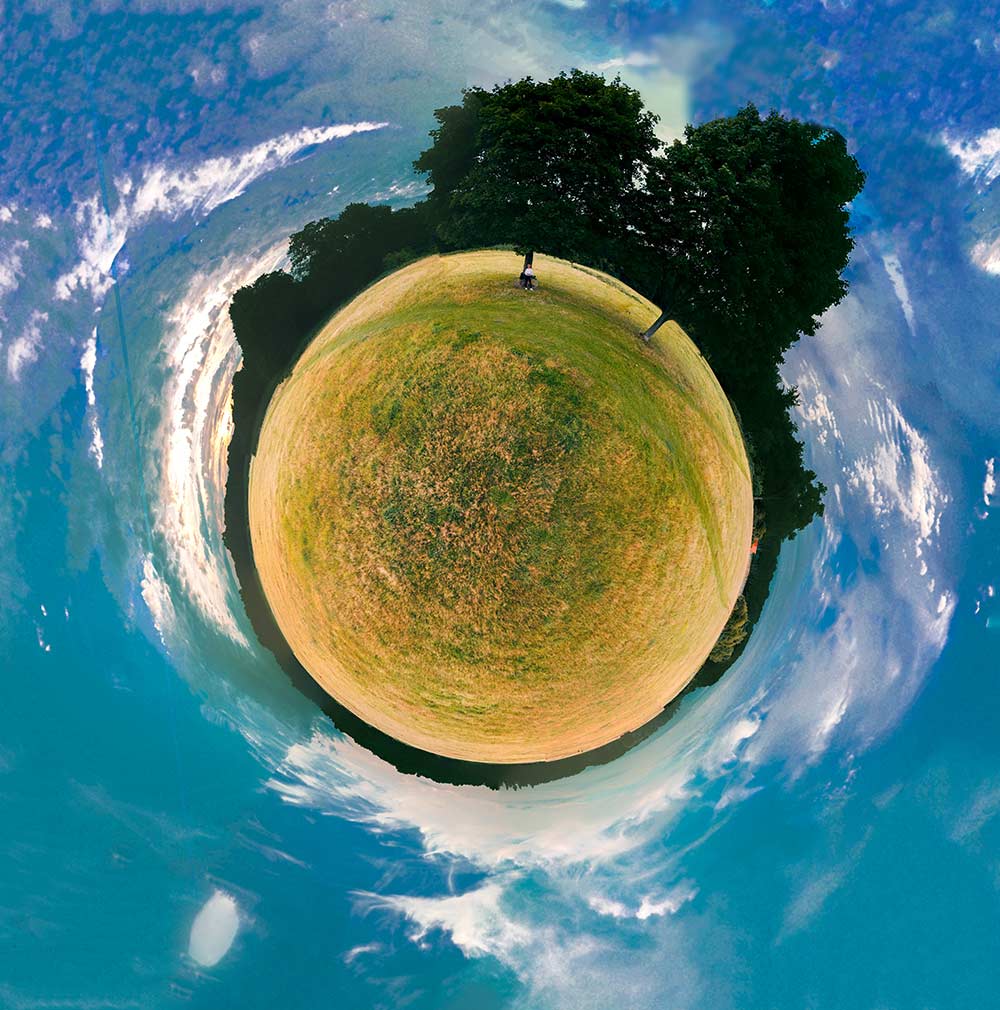
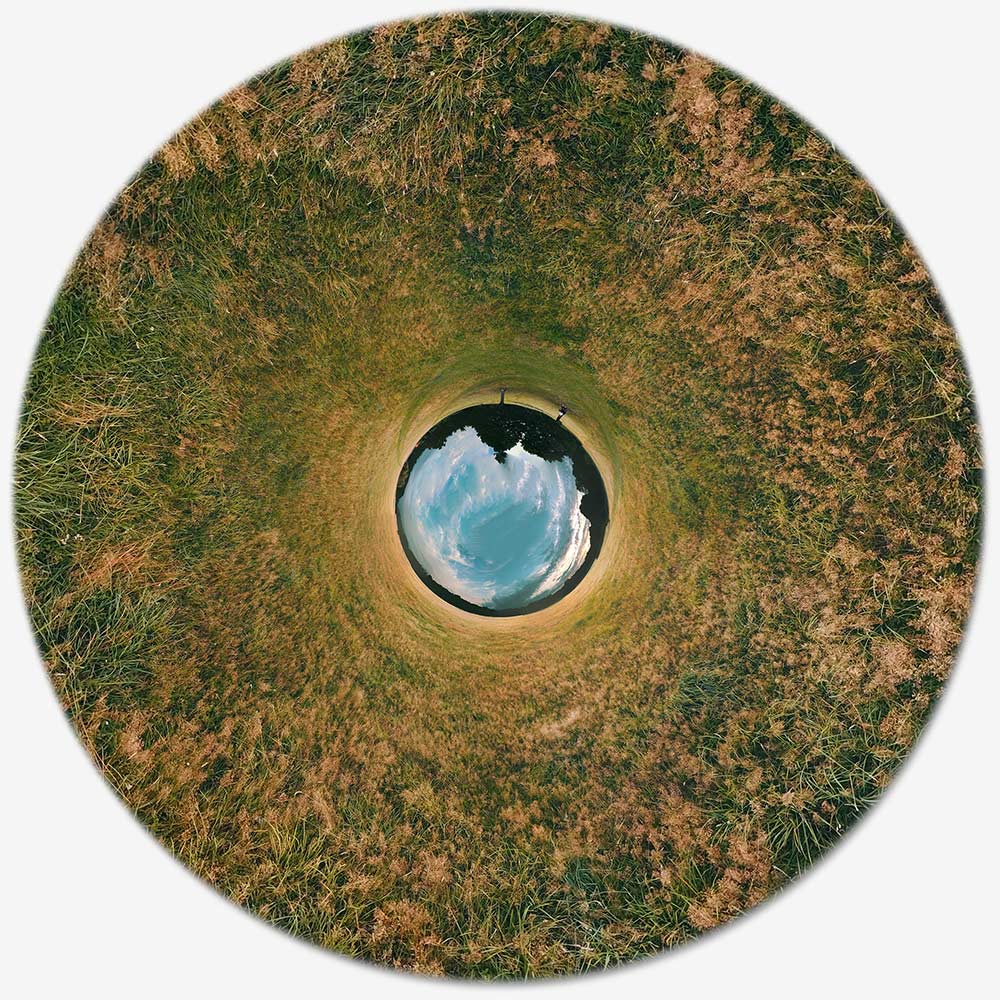
ricoh ist ein pionier in sachen 360°-fotografie. das auf der IFA im september 2017 vorgestellte neue “theta”-modell trägt die nummer V und bietet als erste kompakt-kleine kamera dieser art 4k auflösung. außerdem rechnet sie quasi in echtzeit das vorder- mit dem hinterbild zusammen und erstellt so im nu ein rundumpanorama.

wie bei der gopro in ihrer kleinen version fehlt der theta der monitor. man kann also nicht sehen, was man aufgenommen hat. die verwaltung der kamera ist komplett von PC oder smartphone abhängig. und genau da hakt es, und zwar mächtig.

[/two-fifths]

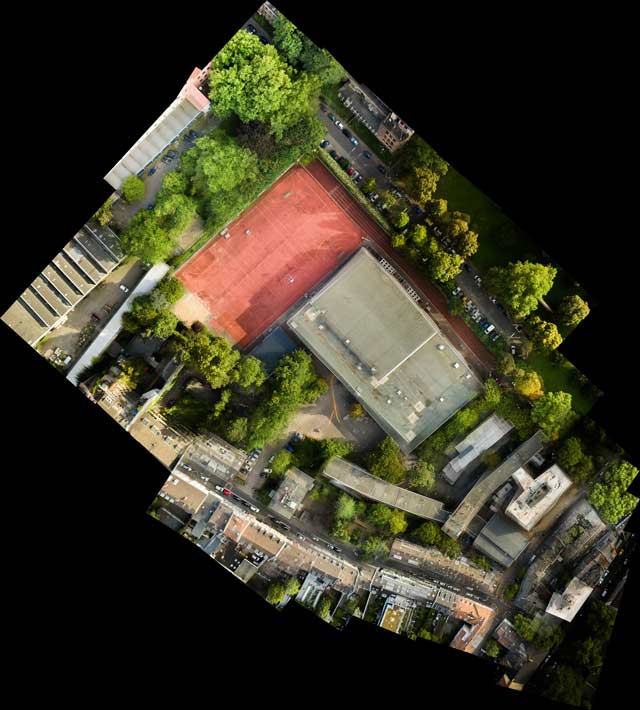
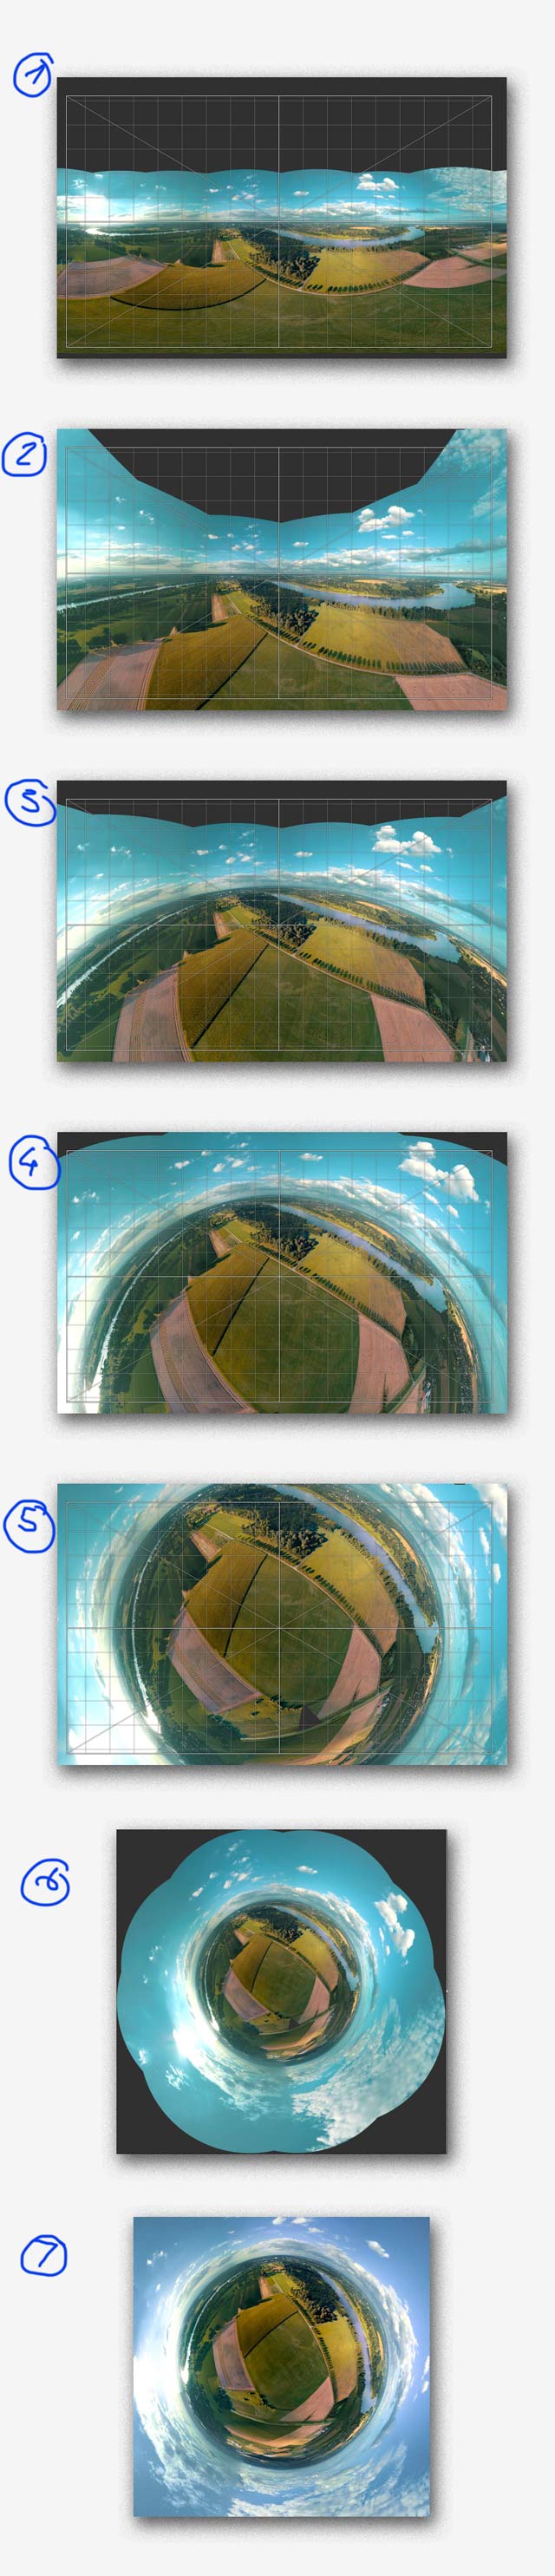
links richtig, rechts falsch interpretiertes 360°

zwar kann man die bilder und videos im finder/explorer ansehen, aber wenn man sie zu youtube oder facebook hochlädt, werden sie in der regel missinterpretiert. statt dass der betrachter dann gemütlich in der rundumsicht herumfahren kann (am smartphone durch bewegung des smartphones), sieht er die szene falsch unterteilt, trennlinien in der mitte oder alles auf dem kopf. dasselbe kann passieren (kann = glückssache?), wenn man den film von der theta aufs smartphone überträgt und von dort hochlädt.

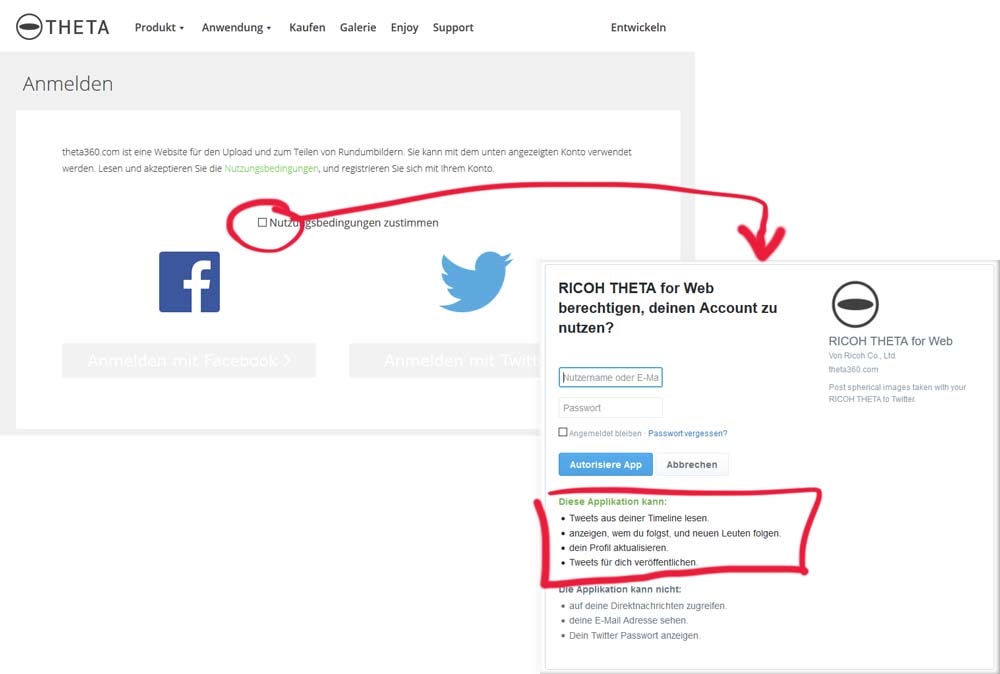
ricoh account tritt datenschutz mit füßen.

hier nochmal zum nachlesen:

Diese Applikation kann:

  • Tweets aus deiner Timeline lesen.
  • anzeigen, wem du folgst, und neuen Leuten folgen.
  • dein Profil aktualisieren.
  • Tweets für dich veröffentlichen.

die ricoh theta app zwingt einen, sich zum “sharen” ein account bei ricoh zuzulegen. das wäre ja noch okay, aber ricoh bietet nur zwei optionen der anmeldung, die beide unsittlich sind, nämlich anmeldung mit facebook oder twitter. in solchen fällen wird immer, auch wenn die datenschutzrichtlinien das gegenteil behaupten, das passwort übertragen. außerdem, was geht es ricoh an, wie ich bei twitter heiße?

auf android (aktuelle version, zwei jahre altes smartphone) stürzt die app dauernd ab. die verbindung zur kamera wird mit WLAN eröffnet. wenn man von dort aus zu youtube hochladen möchte, ginge das schon allein deswegen nicht, weil das handy dann im WLAN der kamera und nicht im internet ist. das problem tangiert sogar das lesen der bedienungsanleitung: statt sie lokal in die app zu integrieren, muss man eine internetseite aufsuchen, um die hilfe zu lesen. auch das verbinden von kamera und handy ist nicht trivial. man muss sich händisch aus dem aktuellen WLAN ab- und bei der kamera anmelden, die app führt einen hier nicht. sie führt einen auch nicht, wieder ins gewohnte WLAN zurückzukommen, wenn man fertig ist. oft ist der kontakt mit der ricoh vom smartphone überhaupt nicht möglich, selbst wenn man im hotspot der kamera ist. ein zentraler punkt wäre die datenorganisation der kamera: wie viele dateien sind vorhanden, wie viel platz ist noch? selbst das löschen der kameravideos ist nicht trivial.

für windows und mac gibt es eine app von ricoh, die die kameraverwaltung erledigt. auch diese app ist dürftig. ruft man sie bei via USB angeschlossener kamera auf, sieht man kein einziges bild auf der kamera. die app ist nämlich kein browser. sie dient allein drei zwecken: a) über den finder/explorer geladene kameramedien zu konvertieren, b) sie zu facebook oder twitter hochzuladen, c) die firmware zu aktualisieren. man muss also die app erst mit daten aus der kamera händisch füttern; was dann geschieht, ist wenig transparent: das video (locker 2 GB für paar minuten video) wird irgendwohin auf den PC gespeichert. (wird es da später wieder gelöscht?) dann gibt es nur eine option, nämlich das video, welches im mp4-format vorliegt, in mp4 zu konvertieren. hä? das fenster, das man dann sieht, steht bei einem 2 GB-video auf meinem PC ungefähr 15 minuten so, ohne dass ein fortschrittsbalken zu sehen ist:

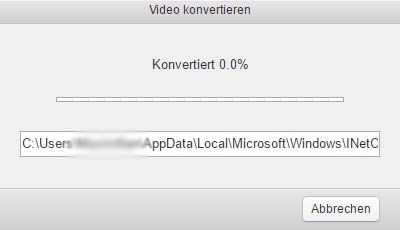
ricoh konvertiert immer mit 0,0%

dann aber taucht plötzlich das konvertierte video auf und sieht in der 360°-darstellung auch korrekt aus. der ton stimmt auch. was da konvertiert wurde, ist unklar, denn ausgangs- und konvertiere datei sind exakt gleich groß.

wie hemdsärmlig die softwareumgebung der an sich perfekt arbeitenden kamera gestrickt ist, sieht man auch an der bedienungsanleitung:

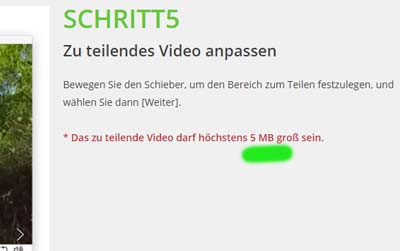
schnell gestricktes manual: gemeint sind 5 GB.

unterm strich: prima kamera, aber so schwer zu gebrauchen, dass man mit dem kauf warten sollte, bis ricoh die umgebung benutzerfrreundlich und bug-free macht.

und: es gibt keinen grund für ricoh, die kamera nicht auch RAW-fotografien, also zum beispiel im DNG-format abspeichern zu lassen. die RAW-bildbearbeitung hat sich inzwischen auch bei semiprofis bewährt, profis tun’s nicht drunter. beispiel: meine drohne hat eine 4k kamera und nimmt natürlich auch RAW auf.

zur 360°-foto- und videografie an sich ließe sich noch viel sagen, das kommt wann anders. eins aber schon jetzt: wenn man die kamera hält, dann nur mit einem selfie-stick, denn sonst füllt ein brei aus fingern und hand die komplette unterseite des 360°-bilds. die kamera hat einen 3-sekunden-selbstauslöser. da muss man sich sehr beeilen, zu verschwinden, z. b. unter den tisch zu tauchen. was dann passiert, wenn man wieder auftaucht und am tischbein anstößt: die theta fällt garantiert um. es sei denn, man hat ein stativchen dafür. dessen drei beine sieht man dann aber immer unten…

stitching and drone | harmony

drone harmony layout preplanning

two days ago when the weather was inviting and the wind was calm i took the chance to try out a new drone app for photo professionals, still in beta, called drone harmony. the basic difference between the competing apps is simple, but impressive: before you plan your flight you tell the app where the obstacles are. the drone then avoids the buildings, trees, fences etc. you tell the app in the second step where and how to fly. maybe in a helix around a tower, or, that’s what i did, in a grid for straight down = orthogonal photography.

to cut things short: i’ll have to repeat the flight because – what i never thought about – the lighting conditions between beginning and end of flight were very different. when i took off, clouds cast soft shadows on the ground. towards the end of the expedition, ten or so minutes later, the sun came out, with sharp late afternoon shadows, confusing all four stitching apps i tried.

flight and photo pattern acroos the layed out area

first i let adobe photoshop lightroom deal with the 44 high res raw photos. i did some colour correction and camera profiling and then asked lightroom to stitch them all together. it took ages, maybe 20 minutes. lightroom offers no option for straight orthogonal images and chooses “perspective”:

lightroom tries stitching 44 photos together.

the result was this:

odd sharp edges (lightroom)

this attempt was not the worst, but puzzling. i could not determine where the extreme edges and distortion came from. the shape of the stitched object does only vaguely resemble the almost rectangular layout of the actual flight. next candidate: microsoft ICE.

microsoft ICE stitch

microsoft ICE did a much more sober stitching. i had used it before for 180° and 360° panoramas and little planet photos. nevertheless the pretty good looking panorama is flawed:

stitching flaws in ICE

the reason for this problem is that the sports playground had different lighting conditions. the third candidate amazed me with its free inventions. you may call it creative or useless: photoshop CC.

photoshop stitching

photoshop, famous in the old days for its stitching capabilities, is a lame duck now. all it presented was the odd collage above, with pretty amazing details (below):

none of these buildings is at the correct position.

let’s zoom in at another section of the same stitching. photoshop thought, why not TWO sports grounds? here the problem with the different lighting situation is obvious:

photoshop invents a double sports ground.

the creativity of photoshop is so amazing that i risked another close look. here the two sports grounds (in reality there’s only one, of course) are seperated by trees:

another attempt in photoshop

autostitch was the last software i tried – and it turned out to be the best, along with microsoft ICE.

autostitch64 does a good job.

like microsoft ICE, it handled the different lighting situations with ease, but both programs have problems with details. this is autostitch, a detail from the center of the image above, buildings which seem to fall into pieces and blend together:

autostitch detail with lots of problems

so, i’ll have to do the flight again and see…


in the meantime, two years later, with better stitching software, i could solve the problem. see → here.

köln süd | 50 m hoch, rundum

rundum panorama köln südstadt

das panorama ist aus 50 metern höhe aufgenommen und hat einen kleinen näh-fehler (stitching problem), der aber nicht tragisch ist. wir sehen den dom, den deutschlandfunk, die severinsbrücke, die nord-südfahrt, die severinstraße, den waidmarkt. etwas näher das friedrich-wilhelm-gymnasium, das hotel mercure und die baustelle des eingestürzten stadtarchivs. diese baugrube wird in einem jahr völlig anders aussehen. let me keep you posted. ich rate zum betrachten auf vollbildmodus zu gehen.

unten dasselbe panorama, diesmal in der → little planet-projektion. weil ich immer wieder gefragt werde, warum man ein panorama nicht “ordentlich” auf papier bringen kann, erinnere ich an den weltatlas. der verzerrt so ungemein, eben weil es immer verzerrt, wenn man etwas dreidimensionales auf papier oder bildschirm bringt.

little planet version des obigen panoramas

dimension planning for mavic | drone

how many meters wide is this scenery? 100? 500?

i’ve struggled with taking vertical panoramas. a vertical panorma means flying the drone at an exact altitude across a certain area, stopping at regular intervals in order to take photos by looking straight down, and finally stitching them all together. with some drone apps such as litchi you can create exact flight patterns using waypoints, and you can tell the drone what to do at certain waypoints, such as taking a vertical photograph before flying to the next programmed spot. i did that the other day and found that the distances i had planned were to long, so that the panorama software ran into stitching problems.

so i looked into distances: what diemension long and wide can the DJI mavic pro lens cover from an altitude of exactly 100 meters? i could have looked up the focal length of the drone’s camera and started the calculation from there, but instead i chose a section of a lake i had photographed recently. i opened google maps in satellite view and checked the dimensions of the water: 50 meters.

google maps says: this is 50 meters.

i compared the dimensions my mavic shot and came to the conclusion that the lens covers about 160 x 80 meters on the ground if it flies 100 meters high. the phantom pro lens has a slighter wider angle and covers a bit more. in order to stay safe for taking vertical panoramas you should stop at every 100 meters in one axis and at 50 meters in the other dimension.

safe dimensions for vertical shots (alt: 100 m)

i give you a few prominent examples: the brooklyn bridge is about 600 m long, from coast to coast. for a panorama you need to take 6 photos to cover the whole bridge.

brooklyn bridge is 600 meters long.

can we cover the leaning tower of pisa in one shot? with ease! the → st. peter’s square in rome? no way! we need at least 6 photos to create a satellite-like hi res map of it.

side topic: when i took some photos for stitching (see → here) i thought about the legal situation in different countries. in most western states it’s prohibited to fly over private property such as a garden or a factory. in practical reality nothing new can be spied out with drones flying at 100 or so meters altitude. nothing “new”, because satellelites do that all the time, and services like google maps or google earth provide those insights (oversights) for free, and free of legal punishment. the tricky thing is when amateur drone pilots fly low across private property, invoking irritation, rage and lots of negative feelings against ALL drone pilots.

riesengroßer little | planet

little planet panorama. foto: ms/dpa

wenn man viele bilder zu einem gesamtwerk vernäht, wie bei einem panorama üblich, entstehen große dateien. in diesem fall zwang das in microsoft ICE zusammengesetzte bild meinen rechner in die knie. das stitching (vernähen) selbst ging noch einigermaßen flott vonstatten, aber der import in photoshop dauerte ewig, lightroom lehnte das panorama von haus aus ab, weil zu groß.

ich sah also nach und fand die verblüffende bildauflösung mit übe 50.000 pixeln breite. das bild belegte in photoshop 5 GB arbeitsspeicher, und weil mein rechner zuhause “nur” 4 GB hat, scharrte sich das programm mühsam speicher auf der festplatte zusammen. jeder bearbeitungsschritt dauerte gefühlt 5 minuten.

anyway. hier oben ist es, gezähmt. → little planet, aufgenommen gestern. und unten ein detail aus dem → nadir (bildzentrum), um die auflösung besser beurteilen zu können.

little planet übrigens: da gibt es immer den tipp, ein paar schön hohe objekte zu haben und nur minimal über den horizont zu gucken. das habe ich hier versucht, indem ich die drohne niedrig fliegen ließ, etwa 3 meter, und nah an den zwillingsbäumen.

detail aus dem nadir des obigen panoramas


little planet step by | step

[two-fifths-first]the sequence below shows you how to create a little planet projection from a 360° series of photographs using microsoft’s ICE. 1) shows the stiching process finished and displays a spherical projection. 2) instead of spherical, stereographic is being applied. 3)-5) shows adjustment of the projection coordinates, until in 6) both right and left ends meet, and we reach a circle. the picture 7) is post production: adjustment of colour and rotation. [/two-fifths-first]
[three-fifths]dies ist ein rezeptbuch zur erstellung von little planet-panoramen mit microsoft’s ICE. das panorama besteht aus 34 einzelaufnahmen und wird von ICE zunächst als sphärische projektion dargestellt (1). wählen wir die stereografische projektion, sieht es schon anders aus (2). die bilder 3–5 zeigen das verändern der koordinaten vertikal mit der maus, bis sich das rechte und linke ende des bilds treffen und einen kreis bilden. in 6) ist das little planet-panorama fertig. bild 7) zeigt noch nachbearbeitungen in einer bildbearbeitungs-app mit leichter farbanpassung und drehung.[/three-fifths]

little planet how-to. → wiki commons

lightroom panoramen | pur

panorama aus ca. 6 einzelbildern. foto: ms/dpa

so soll ein panorama aussehen. es hat seine weitwinkligen verzerrungen, wie wir menschen mit unserem mäßigen weitwinkel-auge sie nicht kennen, und sagt damit: “ich bin ein panorama!” das foto weist – und das ist die stärke von stichting (also zusammennäh-) algorithmen – keine harten übergänge auf; die einzelbilder werden beim zusammenfügen also nicht nur von der geometrie her, sondern auch vom farb- und kontrastwert nahtlos angepasst.

trotzdem funktioniert das nicht immer vollautomatisch so gut, und im bild unten ging quasi alles schief. ich gab → lightroom ca. 20 aufnahmen als futter und ließ die app eine minute lang nachdenken. als sie mir in der vorschau dann das zeigte, klickte ich auf okay, und dann dauerte es für dieses im original knapp 20.000 pixel breite bild, etwa eine viertelstunde, bis es fertig war. was hier genau passiert ist, weiß ich nicht. der helle bereich in der bildmitte könnte mit zwei, drei ausgangsbildern zu tun gehabt zu haben, die gegen die sonne aufgenommen wurden.

schiefgegangenes panorama, aber cool! foto: ms/dpa

panorama in adobe | lightroom

panorama köln nord-ost-süd. foto: ms/dpa

panoramen aus mehreren einzelbildern zusammensetzen konnte software schon lange. vor ca. 15 jahren klappte das mit der geometriezusammensetzung schon ganz gut, aber der knackpunkt war, den einzelbildern eine farb- und belichtungscharakteristik zu geben, dass die übergänge nicht mehr sichtbar waren. im beispiel hier oben, aufgenommen heute nachmittag aus 60 metern höhe mit meiner drohne, waren im original die fotos im rechten bereich (also nach süden) viel dunkler als die richtung dom (norden).

ich habe hier erstmals die automatische zusammensetzung der fünf einzelaufnahmen zu einem panorama von adobe photoshop lightroom CC erledigen lassen, und das ergebnis, was nach ca. 3 sekunden so dastand, lässt sich sehen. 11.000 pixel breit. durch rechten mausklick auf das bild oben lässt sich eine verkleinerte, aber immerhin 2000 pixel breite version lokal speichern.

entscheidend dafür, dass die belichtungs- und farbübergänge so perfekt sind, ist das originalformat der aufnahmen: die drohnenkamera nimmt nämlich auf wunsch RAW auf, also nicht nur jpeg. im RAW-format sind zahlreiche informationen enthalten, die man nicht direkt sieht, während in jpeg alles festgelegt ist. eine stärke von lightroom ist, dass sich das programm immer im RAW-bereich bewegt, also auch das berechnete panorama noch RAW ist. ich habe es erheblich aufgehellt und ein wenig das weiß abgesenkt.