created feb. 1, 2002
 |
<== Alle Maya-Befehle in diesem Buch - Alle! In Deutsch! |
created feb. 1, 2002
|
<== Alle Maya-Befehle in diesem Buch - Alle! In Deutsch! |
Basic things you should know (and maybe never dared asking).
Grundsätzliches, was Sie wissen sollten (aber vielleicht nie zu fragen wagten)
|
How do I bring a background image into my scene effectively? |
 |
Wie bringe ich rasch ein Hintergrundbild in meine Szene? |
|
|
 |
|
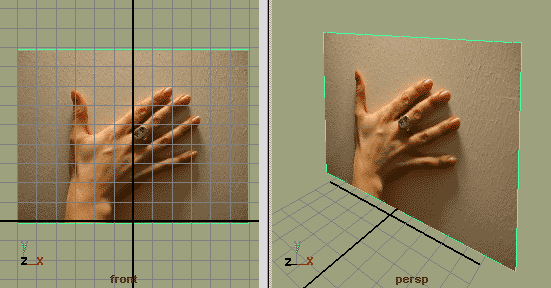
Backdrop images in Maya are called image planes. Their major use is for modeling with a reference. For example you could take a photo of a hand, bring it into the scene as an image plane and model the hand according to that real-life reference. |
Hintergrundbilder heißen in Maya Image Planes (Bild-Ebenen). Sie werden meist dazu benutzt, um nach einer Bildvorlage zu modellieren, etwa eine 3D-Hand nach der Vorlage des Fotos einer realen Hand. |
|
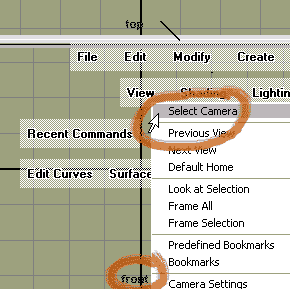
Unfortunately there is no one-click-solution to bringing an image plane into the scene - but a four-click-way. Image planes need to be linked to cameras, for example the front camera. You can select the front camera in serveral ways. One is to move the mouse over the front window and choose View > Select Camera. |
Leider gibt es keinen super-kurzen Weg, das Hintergrundbild in die Szene zu bringen -aber einen kurzen.
Hintergrundbilder sind an Kameras wie z.B. die Front-Kamera gebunden. Sie können sie auf verschiedene Arten auswählen. Eine besteht darin, den Mauszeiger über das Front-Fenster zu bewegen und den Befehl View > Select Camera auszulösen. |
|
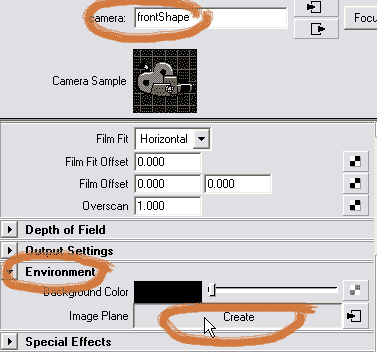
Once the camera is selected, you can call up its attribute editor. Try the icon on the top right of the Maya window for a change. In the front camera's attribute editor, open the section Environment and click on Create next to Image Plane. |
Rufen Sie bei ausgewählter Kamera den Attribute Editor auf. Benutzen Sie zur Abwechslung das kleine Icon oben rechts im Maya-Fenster. Öffnen Sie im Attribute Editor der Front-Kamera die Sektion Environment (Umgebung), und klicken Sie auf die Schaltfläche Create (erzeugen) neben Image Plane. |
|
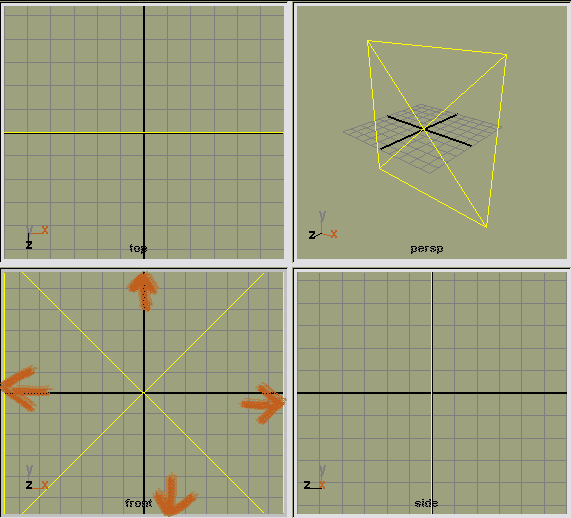
A yellow object enters the scene. It is a placeholder for the photograph we'll bring in in the next step. Note: The image plane is parallel to the front view. It is orthogonal to the top and side windows and represented as yellow line there. |
Ein gelbes Objekt findet sich in allen vier Fenstern ein. Es ist der Platzhalter für das künftige Bild. Beachten Sie, dass es in einer Ebene mit dem Front-Fenster ist. Im Top- und Side-Fenster erscheint es, weil es zu diesen Kameras senkrecht steht, als gelbe Linie. |
|
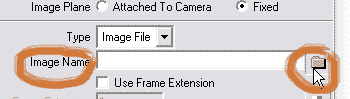
Still in the Environment section of the Front Camera's Attribute Editor, click on the folder icon next to Image Name. This opens the file browser and points you to the source images directory of your current project. Select the image you want to use as an image plane there (or anywhere else where you put it). |
Klicken Sie in der Sektion Environment des Attribute Editors der Kamera auf den Ordner neben Image Name. Damit öffnet sich der File Browser und führt Sie in das Source Images (Quellbilder) Verzeichnis Ihres aktuellen Projekts. Wählen Sie dort (oder anderswo) das gewünschte Hintergrundbild aus. |
|
Now the yellow placeholder appears filled with the desired image. Use the Center entries in the Placement Extras section to bring the image plane into the proper position. |
Der gelbe Platzhalter wird nun mit dem Bild gefüllt. Öffnen Sie die Sektion Placement Extras, um die drei Einträge neben Center zu verändern, wenn Sie das Bild in eine andere Position bewegen wollen. |

|
Final Note. Instead of still images for image planes - like in the example above - you can as well use sequences of images or movie clips. They can be fixed to, for example, a perspective camera so they always fill its view and follow the camera's motion. If you want to get rid of an image plane try this: Select and delete it in the camera section of the Hypershader. |
Abschlussbemerkung.
Image Planes können Standfotos wie im obigen Beispiel sein, aber auch Bildfolgen oder Filme. Man kann sie an Kameras, etwa die Perspektivkamera binden, sodass sie dieser stets folgt und immer das ganze Bild ausfüllt. Um ein Image Plane los zu werden, können Sie es in der Kamera-Sektion des Hypershaders aufsuchen und löschen. |